Categories
Go Intermediate tutorial

Goroutines and the ease of use

What is the most efficient way to use goroutines in simple terms for scalable service?

Goroutines are a powerful feature of the Go programming language that allows you to achieve concurrency and scalability in your applications. Here’s a simple explanation of how to use goroutines efficiently for a scalable service:

  1. Understand Concurrency: Goroutines are lightweight threads that enable concurrent execution. Concurrency is about making progress on multiple tasks simultaneously. It’s important to understand the concept of concurrency and how it differs from parallelism.
  2. Identify Tasks: Identify the tasks that can be executed independently or in parallel. These tasks could be parts of your service that can run concurrently, such as handling incoming requests, processing data, or performing I/O operations.
  3. Use Goroutines: Launch goroutines to execute the identified tasks concurrently. Goroutines are created using the go keyword followed by a function call. For example: go processRequest(request). Each goroutine represents a separate flow of execution.
  4. Communicate with Channels: To synchronize and communicate between goroutines, use channels. Channels allow goroutines to send and receive values safely. You can create a channel using the make function and send or receive data using the <- operator.
  5. Utilize WaitGroups: To ensure that all goroutines finish their work before the program exits, you can use the sync.WaitGroup type. It provides a mechanism to wait for a collection of goroutines to complete. Increment the wait group counter before launching a goroutine, and decrement it when the goroutine completes its work.
  6. Avoid Unbounded Goroutines: Be cautious when creating goroutines, as creating too many goroutines can lead to excessive resource consumption and hinder performance. You can limit the number of concurrent goroutines by using techniques such as worker pools or semaphores.
  7. Handle Errors: Ensure you handle errors appropriately in your goroutines. If an error occurs in a goroutine, handle it locally or communicate it back to the main goroutine through a channel or other means.
  8. Monitor Resource Usage: Keep an eye on the resource usage of your service, including CPU, memory, and I/O. This will help you optimize the number of goroutines and identify any performance bottlenecks.

Remember that efficient use of goroutines involves a good understanding of your application’s requirements and characteristics. It’s essential to balance concurrency and resource usage to achieve the desired scalability.

What is an example of a simple Goroutine use?

package main

import (
	"fmt"
	"time"
)

func main() {
	// Launch a goroutine to perform a time-consuming task
	go performTask()

	// Continue with other tasks in the main goroutine
	for i := 1; i <= 5; i++ {
		fmt.Println("Main Goroutine: Doing some other work")
		time.Sleep(1 * time.Second)
	}

	// Wait for a few seconds to allow the goroutine to complete its task
	time.Sleep(3 * time.Second)
}

func performTask() {
	fmt.Println("Goroutine: Starting time-consuming task")
	time.Sleep(2 * time.Second)
	fmt.Println("Goroutine: Time-consuming task completed")
}

In this example, we launch a goroutine using the go keyword followed by the function call to performTask(). The performTask() function simulates a time-consuming task by sleeping for 2 seconds.

While the goroutine is executing the time-consuming task, the main goroutine continues to execute its own tasks in the loop, printing “Main Goroutine: Doing some other work” every second.

After waiting for a few seconds to allow the goroutine to complete its task, the program exits. You will see output from both the main goroutine and the goroutine executing the time-consuming task interleaved in the console.

By using goroutines, you can perform tasks concurrently and effectively utilize the available resources.

A complex example of how to use a Goroutine with Channels

package main

import (
	"crypto/md5"
	"fmt"
	"io"
	"net/http"
	"os"
)

type File struct {
	URL      string
	FileName string
	Checksum string
}

func main() {
	fileURLs := []string{
		"https://example.com/file1.txt",
		"https://example.com/file2.txt",
		"https://example.com/file3.txt",
	}

	fileChannel := make(chan File)
	doneChannel := make(chan bool)

	// Launch goroutines to download files concurrently
	for _, url := range fileURLs {
		go downloadFile(url, fileChannel)
	}

	// Wait for all downloads to complete
	go func() {
		for range fileURLs {
			<-doneChannel
		}
		close(fileChannel)
	}()

	// Calculate checksums for downloaded files
	for file := range fileChannel {
		go calculateChecksum(&file, doneChannel)
	}

	// Wait for all checksum calculations to complete
	for range fileURLs {
		<-doneChannel
	}

	fmt.Println("All files downloaded and checksums calculated successfully.")
}

func downloadFile(url string, fileChannel chan<- File) {
	response, err := http.Get(url)
	if err != nil {
		fmt.Printf("Error downloading %s: %s\n", url, err.Error())
		return
	}
	defer response.Body.Close()

	fileName := getFileNameFromURL(url)
	output, err := os.Create(fileName)
	if err != nil {
		fmt.Printf("Error creating file %s: %s\n", fileName, err.Error())
		return
	}
	defer output.Close()

	_, err = io.Copy(output, response.Body)
	if err != nil {
		fmt.Printf("Error downloading %s: %s\n", url, err.Error())
		return
	}

	fileChannel <- File{URL: url, FileName: fileName}
}

func calculateChecksum(file *File, doneChannel chan<- bool) {
	checksum, err := calculateMD5Checksum(file.FileName)
	if err != nil {
		fmt.Printf("Error calculating checksum for %s: %s\n", file.FileName, err.Error())
		return
	}

	file.Checksum = checksum
	fmt.Printf("Checksum calculated for %s: %s\n", file.FileName, checksum)

	doneChannel <- true
}

func calculateMD5Checksum(fileName string) (string, error) {
	file, err := os.Open(fileName)
	if err != nil {
		return "", err
	}
	defer file.Close()

	hash := md5.New()
	if _, err := io.Copy(hash, file); err != nil {
		return "", err
	}

	checksum := hash.Sum(nil)
	return fmt.Sprintf("%x", checksum), nil
}

func getFileNameFromURL(url string) string {
	// Extract the file name from the URL
	// You can implement your own logic based on the URL structure
	return "downloaded_file.txt"
}

In this example, we have a list of file URLs that we want to download concurrently. We create two channels: fileChannel to communicate downloaded files to the checksum calculation goroutines and doneChannel to signal completion of individual goroutines.

We launch a goroutine for each file URL in the downloadFile function, which downloads the file and sends the file information through the fileChannel. After all the downloads are completed, we close the fileChannel to signal the checksum calculation goroutines to exit.

In the calculateChecksum function, we receive the file information from the fileChannel, calculate its checksum, and update the Checksum field of

Categories
AWS Beginner DynamoDB Go Intermediate tutorial

Testing locally DynamoDB in Go

Testing locally DynamoDB in Go

Testing DynamoDB locally in Go or any language is tricky. In this quick article I will provide a solution on how to test locally using a docker container and your web service that interfaces with AWS DynamoDB.

First, you will need a DynamoDB instance running locally so that you can interact with it from your service.

DynamoDB Instance with Docker-Compose

dynamodb:
    image:  "amazon/dynamodb-local:latest"
    command: "-jar DynamoDBLocal.jar -sharedDb -dbPath ./data"
    container_name: dynamodb
    ports:
      - 8000:8000
    environment:
      AWS_REGION: "us-east-1"
      AWS_ACCESS_KEY_ID: "YOUR_AKID"
      AWS_SECRET_ACCESS_KEY: "YOUR_SECRET_KEY"
      AWS_SESSION_TOKEN: "TOKEN"
    working_dir: "/home/dynamodblocal"
    volumes:
      -  "./docker/dynamodb:/home/dynamodblocal/data"

The code above shows you how to create a simple DynamoDB instance for you to test with locally user a docker-compose.yml file. In this article we are assuming that you are running your webservice that has visibility to the DynamoDB container, the setup of the web service is out of scope for this article.

When using AWS SDK v2 for Golang things are done way differently then on version v1. In v1, you could provide an endpoint, a region and credentials that required for you to test locally. Just for reference, this is how you test in aws-sdk-go-v1:

        creds := credentials.NewEnvCredentials()
	_, err := creds.Get()
	if err != nil {
		return nil, err
	}
	sess, err := session.NewSession(&aws.Config{
		Region:      aws.String("us-east-1"),
		Endpoint:    aws.String("http://localhost:8000"),
		Credentials: creds},
	)
	if err != nil {
		return nil, err
	}
	// Create DynamoDB client
	svc := dynamodb.New(sess)

The endpoint value is whatever url you specified in your docker-compose file for you AWS DynamoDB instance.

Implement AWS SDK Go v2

Now to answer the question of this topic: Testing locally DynamoDB, how can we accomplish this? Compared to v1, we have to do things differently. In v2 you have to have a several awsconfig.LoadOptionFunc’s. You will need the WithRegion, WithEndpointResolver, and lastly for local testing WithCredentialsProvider. For v2, make sure you have an IAM Role that is able to talk to your ec2 instance or whatever infrastructure you are using to serve your app and the DynamoDB instance.

customResolver := aws.EndpointResolverFunc(func(service, region string) (aws.Endpoint, error) {
	if os.Getenv("APP_ENV") == "local" {
		return aws.Endpoint{
			URL: config.Dynamo.Endpoint,
		}, nil
	}
	// returning EndpointNotFoundError will allow the service to fallback to it's default resolution
	return aws.Endpoint{}, &aws.EndpointNotFoundError{}
})
var (
	cfg aws.Config
	err error
)
if os.Getenv("APP_ENV") == "local" {
	cfg, err = awsconfig.LoadDefaultConfig(context.TODO(), awsconfig.WithRegion("us-east-1"), awsconfig.WithEndpointResolver(customResolver), awsconfig.WithCredentialsProvider(credentials.StaticCredentialsProvider{
		Value: aws.Credentials{
			AccessKeyID: "dummy", SecretAccessKey: "dummy", SessionToken: "dummy",
		Source: "Hard-coded credentials; values are irrelevant for local DynamoDB",
		},
	}))
} else {
	cfg, err = awsconfig.LoadDefaultConfig(context.TODO(), awsconfig.WithRegion("us-east-1"), awsconfig.WithEndpointResolver(customResolver))
}	
if err != nil {
	panic(err)
}
svc := dynamodb.NewFromConfig(cfg)

In the code above, you will notice that I check for an environment variable to equal “local”. The reason for this is, in v2 you are discouraged from using AWS access keys. When you test locally, the container requires an AWS access key, therefore you can create dummy credentials to use when testing locally.

Thank you for taking the time to read this information. You can find other articles here.

Categories
Beginner Go tutorial

Sentinel Errors, should we use them in Go?

Sentinel Errors, should we use them in Go?

Sentinel errors, should we use them in Go? When you use a sentinel error in your code, you are providing a way for your consumer to fail gracefully. How can you accomplish this? Let us first understand how to raise an error in Go.


func main() {
  // First way, using errors package
  err := errors.New("You have raise an error using the errors package")
  // Second way, using the fmt package
  uid := "randomUIDValue091"
  err = fmt.Errorf("%s is invalid format.", uid)
}

Currently, you can create an error using two methods. The first as shown in the sample code, you can use the errors package, which in turn enables you to use the New operator to generate an error. The second example shown in the sample code allows you to create an error using the fmt package calling on the Errorf method, which in turn returns an error type.

Sentinel Errors

Now that we understand how to create an error in Go, what is a sentinel error? Some errors are meant to signal that the code can no longer move forward due to the current state. Dave Cheney, a developer who has been active in Go for many years used this term to describe these errors:

The name descends from the practice in computer programming of using a specific value to signify that no further process is possible. So to [sic] with Go, we use specific values to signify an error.

Dave Cheney

Here are some existing examples of a Sentinel Errors are: io.EOF, or constans in the syscall lib syscall.ENOENT.

You typically declare the sentinel error at the package level. You also start the name with Err; io.EOF is a notable exception. Treat these errors as read-only (In go we cannot enforce this, but it would be an error if you as the programmer were to change these). Just to be clear then, when we use sentinel errors this is meant to signal that you cannot start or continue processing.

package main

import (
	"fmt"
	"io"
	"os"
)

const FILE = "/tmp/GeeksforGeeks.txt"

func main() {
	// Create tmp file that is empty
	cFile, err := os.Create(FILE)
	defer cFile.Close()

	// Open the file for read
	rFile, err := os.Open(FILE)
	defer rFile.Close()

	// Read the first 5 bytes
	data := make([]byte, 5)
	_, err = rFile.Read(data)

	if err == io.EOF {
		fmt.Println("You have come to the end of the file")
	}
}

The code above does couple simple tasks, it creates a file, it then opens the file and lastly it reads the 5 first bytes of the file. If the content is empty, which in this case it is, it returns the io.EOF error, meaning there is no more content. In my code, I compare err with the package level sentinel error io.EOF and if true, gracefully deal with it. Follow the link to play around with the above code.

Constant Sentinel error in your code; good idea?

package custerr

// Declare Sentinel type
type Sentinel string

// Implement Error interface 
func(s Sentinel) Error() string {
  return string(s)
}

In the code above, I have declared a type Sentinel, and then implemented the Error interface.

package mypkg

const (
  ErrBz = custerr.Sentinel("bz error")
  ErrBr = custerr.Sentinel("br error")
)

In the code above we are casting a string to type Sentinel; it could be a bit confusing considering it looks like we are calling a function, but that is not the case. The problem with this is, the code is not idiomatic. Using sentinel errors create package coupling which in turn could lead to potential cyclic import errors.

Conclusion

Do not use sentinel errors, we can use other ways to express errors and to check for specific types of errors. Stay tuned, we will address this in a future article! Don’t miss out on other tutorials.

Categories
Beginner Go tutorial

Go Pointers, scary or not?

Go Pointers, scary or not?

Go Pointers, scary or not? If you are new to Go, and you are confused as to what an * is in front of a variable or the & in front of a variable are? You have come to the right place. Let us run through this oddity for those that have not programmed in C or C++.

What is the Point…er in Go?

A pointer is, a variable that points to the location in memory of where a value is stored.

var f int32 = 2
var b bool = false
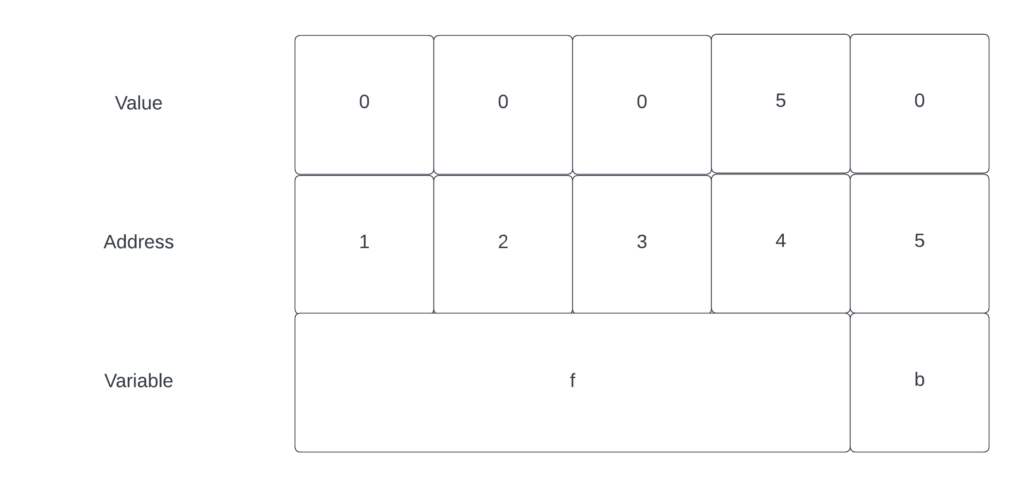
What a variable looks like in memory
How a variable looks in memory

In programming, every variable is stored in a memory address. Different types of variables can take up different amounts of memory. In the provided example, we have two variable, one of type int32 which takes 4 bytes and the other Boolean which only takes 1. Variable f starts at address location 1 and variable b starts a address 5.

Variable declaration that shows location of normal value and it's pointer.
How a pointer looks like in memory

A pointer can reference the location of variable that is of any type. A pointer also has a fixed size regardless of the size of the typed being pointed at. Pointers enable a lot of cool things when used correctly. Let us go in depth.

The & is the address operator. This value is used in front of the variable and it returns the address of the memory location.

The * is the indirection operator. This value goes in front of the variable that is of pointer type and returns the pointed-to value.

foo := 2
pointerFoo := &foo
sum := 2 + *pointerFoo
fmt.Println(sum) // prints out 7

Click here and play around on the Go playground.

How to use?

The downside of dereferencing is if you do this on a non-nil pointer, the system will panic and you will have to recover from this state.

The pointer then becomes its own type of pointer type. It is prefixed with a * before a type name. A pointer type can be based on any valid type. On a side note, when using the new operator this in turn will create a pointer variable. The new pointer variable will return a zero value instance of the provided type.

var i = new(int) // returns 0
var s = new(string) // returns ""
var b = new(boolean) // returns false
etc...

The new function is rarely used. For structs, use an & before a struct literal to create a pointer instance. You can’t do this on primitive literals such as numbers, Booleans and strings. The reason for this is that they don’t have a memory address; they exit only at compile time.

foo := &Foo{}
var s string
stringPointer := &s

I hope you have a better understanding of what a Go pointer is, and you don’t find it scary or intimidating when coding in Go and you stumble upon this. Go Pointers, scary or not? We can assert they are not scary and provide great flexibility in our program. For more tutorials, just follow the link

Categories
Go tutorial

Golang structs the foundation of all

Go structs the foundation of all

What are structs? Well structs are the foundation of Golang. If you are coming from PHP or Python or Ruby or any OOP programming language you can perceive these as classes but not exactly. In your typical class, you can define fields and functions as private or public or in-between. However, Golang does this a bit different.

Golang is different

How so? For one, if the variable name or the method name is capitalize, Go perceives this as an exported value. Therefore, if you are trying to access the struct or a method or any variable from a package in a different package, then this value needs to be capitalized in order to be used outside the package where it is defined. Now, with that said, the reverse is true. If the struct or the variable or the method is lowercase, then this makes it private in a sense, meaning, it is only usable within the package that defined it. This however, is a subject for another time. Let us give an example on how to create a struct.

Structs the foundation of all

type Person struct {
  Name     string
  LastName string
  Age      int
}

Go’s structs are typed collections of fields. They’re useful for grouping data together to form records

In the above example we have defined a Go struct that is named Person, and it contains three fields or attributes that have their types defined next to them. The Name and the LastName are both of type string, and Age is of type int.

// Initialize a variable using the var keyword
var mike Person
Person.Name = "Mike"
Person.LastName = "Doe"
Person.Age = 30

// Or you can just use short hand
john := Person{
  Name:     "John",
  LastName: "Doe",
  Age:      25,
}

In the above example, you are provided two ways you can initialize a variable with the same type, in our case Person. The first example uses the var reserved keyword to assign mike as type Person. The second variant uses short hand to do the assignment, but it also allows you to set the key values of the struct.

There are a limited number of predefined types that are available to your declared attributes. These values are:

  • Built-in string type:
    • string
  • Built-in bool type:
    • bool
  • Built-in numeric types:
    • int, int8, int16, int32, int64, uint, uint8, uint16, uint32, uint64, rune, uintptr, (byte)
    • float32, float64
    • complex64, complex128

In later articles, I will go over on how you can use structs and composition to add behavior to a struct. Here is a sneak preview of how we can add functionality to our Person struct.

// SayHello
func (p *Person) SayHello() string {
  return fmt.Sprintf("Hello world, from %s %s", p.Name, p.LastName)
}

Can you guess what is going on in this method?

Thank you for reading, Golang structs the foundation of all. If you wish to play around with structs, you can do that here.

Categories
github tutorial

Add your code base to an existing Github repository

Github

Do you wish to add a code base folder to an existing empty repo in Github? If so, then you have come to the right place. Let us add your code base to an existing Github repository. In this small tutorial, I want to go ahead and show you how to accomplish this task in the quickest way possible.

First you will have to have an existing repository in Github, preferably an empty repository. The other thing you will need is a folder. This folder contains your code that you wish to upload to your existing repository. You will have to initialize a github repository locally by doing git init. The following action we have to do, is we have to add a remote to the newly initialize git folder. Once we have added a reference to the remote url, we can now override the old branch name with the new one adding the -M flag. The remaining item we have to do is push our committed branch and use the upstream flag.

git init
git remote add origin https://github.com/<user>/<repo>.git
git branch -M master
git push -u origin master

Awesome, we now have a working repository that you can work out of and upload your latest changes on Github.

I’ll be adding more tutorials like this one in the near future on Media Liege.